Create Google app
Create Google app to get
Notes: Ignore “Restrictions” at the moment
Install Amplify into local environment
Install AWS Amplify CLI
$ npm install -g @aws-amplify/cli
Create AWS profile
Create AWS account, then
$ amplify configure
to create AWS profile with “accessKeyId” and “secretAccessKey“
Install AWS Amplify into React Native app
Install dependencies
$ yarn add aws-amplify aws-amplify-react-native
Install Amplify
$ amplify init
Accept defaults is OK, use ‘test’ environment name, use profile you have just created
Error: “The AWS Access Key Id needs a subscription for the service”
Solution: https://aws.amazon.com/premiumsupport/knowledge-center/error-access-service/
Install Cognito authentication into React Native app
Install dependency
$ yarn add amazon-cognito-identity-js
Install auth
$ amplify add auth
- Do you want to use the default authentication and security configuration?
Default configuration with Social Provider (Federation) - How do you want users to be able to sign in when using your Cognito User Pool?
Username - What domain name prefix you want us to create for you?
amplifyauthXXXXXXXXX (use default or create custom prefix) - Enter your redirect signin URI:
myapp:// - Do you want to add another redirect signin URI:
N - Enter your redirect signout URI:
myapp:// - Do you want to add another redirect signout URI:
N - Select the social providers you want to configure for your user pool:
Choose Google by using Space key - Finally, you’ll be prompted for your App IDs & Secrets for Google, enter them & press enter to continue.
Deploy
$ amplify push
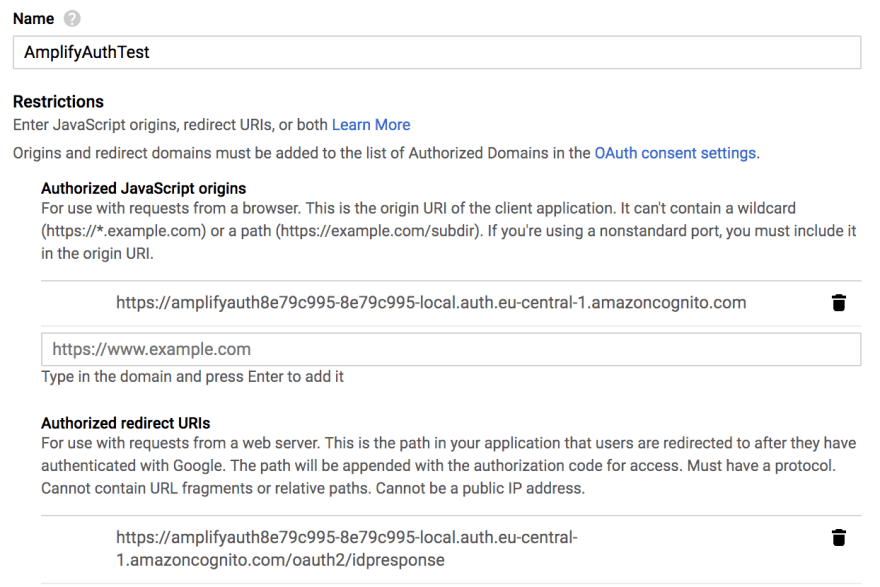
Configure Google app with authentication info
- Open https://console.developers.google.com/apis/credentials
- Click on the client ID to update the settings.
- Under Authorized JavaScript origins, add the OAuth Endpoint.
- For the Authorized redirect URIs, add the OAuth Endpoint with
/oauth2/idpresponseappended to the URL

- Save
Create URL Scheme for iOS and Android
info.plist
<key>CFBundleURLTypes</key>
<array>
  <dict>
    <key>CFBundleURLSchemes</key>
    <array>
      <string>myapp</string>
    </array>
  <dict>
</array>
AndroidManifest.xml
<activity ...>
  <intent-filter>
    <action android:name="android.intent.action.MAIN" />
    <category android:name="android.intent.category.LAUNCHER" />
  </intent-filter>
...
  <intent-filter android:label="filter_react_native">
    <action android:name="android.intent.action.VIEW" />
    <category android:name="android.intent.category.DEFAULT" />
    <category android:name="android.intent.category.BROWSABLE" />
    <data android:scheme="myapp" />
  </intent-filter>
Create Google login button in React Native app
/**
 * Sample React Native App
 * https://github.com/facebook/react-native
 *
 * @format
 * @flow
 */

import React from 'react';
import {SafeAreaView, StatusBar, Button} from 'react-native';

import {Auth} from 'aws-amplify';
import Amplify from 'aws-amplify';
import config from './aws-exports';
Amplify.configure(config);

const App: () => React$Node = () => {
  return (
    <>
      <StatusBar barStyle="dark-content" />
      <SafeAreaView>
        <Button
          title="Sign in with Google"
          onPress={() => Auth.federatedSignIn({provider: 'Google'})}
        />
      </SafeAreaView>
    </>
  );
};

export default App;
Leave a Reply