How to add React Native into existing native Android/iOS app (1)?

Follow this instruction integration-with-existing-apps

You may need to install “react”: “x.x.x” by yourself. It is recommened to create an example React Native AwesomeProject for reference.

Android

Add code to start the React Native runtime and tell it to render JS component

To do this, we’re going to create an Activity that creates a ReactRootView, starts a React application inside it and sets it as the main content view.

Plain text
Copy to clipboard
Open code in new window
EnlighterJS 3 Syntax Highlighter
class MyReactActivity : Activity(), DefaultHardwareBackBtnHandler {
private lateinit var reactRootView: ReactRootView
private lateinit var reactInstanceManager: ReactInstanceManager
override fun onCreate(savedInstanceState: Bundle?) {
super.onCreate(savedInstanceState)
SoLoader.init(this, false)
reactRootView = ReactRootView(this)
val packages: List<ReactPackage> = PackageList(application).packages
// Packages that cannot be autolinked yet can be added manually here, for example:
// packages.add(MyReactNativePackage())
// Remember to include them in `settings.gradle` and `app/build.gradle` too.
reactInstanceManager = ReactInstanceManager.builder()
.setApplication(application)
.setCurrentActivity(this)
.setBundleAssetName("index.android.bundle")
.setJSMainModulePath("index")
.addPackages(packages)
.setUseDeveloperSupport(BuildConfig.DEBUG)
.setInitialLifecycleState(LifecycleState.RESUMED)
.build()
// The string here (e.g. "MyReactNativeApp") has to match
// the string in AppRegistry.registerComponent() in index.js
reactRootView?.startReactApplication(reactInstanceManager, "MyReactNativeApp", null)
setContentView(reactRootView)
}
////////////////////////////////////////////////////////////////////////////////////////////////
////////////////////////////////////////////////////////////////////////////////////////////////
override fun invokeDefaultOnBackPressed() {
super.onBackPressed()
}
override fun onBackPressed() {
reactInstanceManager.onBackPressed()
super.onBackPressed()
}
override fun onKeyUp(keyCode: Int, event: KeyEvent?): Boolean {
if (keyCode == KeyEvent.KEYCODE_MENU && reactInstanceManager != null) {
reactInstanceManager.showDevOptionsDialog()
return true
}
return super.onKeyUp(keyCode, event)
}
////////////////////////////////////////////////////////////////////////////////////////////////
////////////////////////////////////////////////////////////////////////////////////////////////
override fun onPause() {
super.onPause()
reactInstanceManager.onHostPause(this)
}
override fun onResume() {
super.onResume()
reactInstanceManager.onHostResume(this, this)
}
override fun onDestroy() {
super.onDestroy()
reactInstanceManager.onHostDestroy(this)
reactRootView.unmountReactApplication()
}
}
class MyReactActivity : Activity(), DefaultHardwareBackBtnHandler { private lateinit var reactRootView: ReactRootView private lateinit var reactInstanceManager: ReactInstanceManager override fun onCreate(savedInstanceState: Bundle?) { super.onCreate(savedInstanceState) SoLoader.init(this, false) reactRootView = ReactRootView(this) val packages: List<ReactPackage> = PackageList(application).packages // Packages that cannot be autolinked yet can be added manually here, for example: // packages.add(MyReactNativePackage()) // Remember to include them in `settings.gradle` and `app/build.gradle` too. reactInstanceManager = ReactInstanceManager.builder() .setApplication(application) .setCurrentActivity(this) .setBundleAssetName("index.android.bundle") .setJSMainModulePath("index") .addPackages(packages) .setUseDeveloperSupport(BuildConfig.DEBUG) .setInitialLifecycleState(LifecycleState.RESUMED) .build() // The string here (e.g. "MyReactNativeApp") has to match // the string in AppRegistry.registerComponent() in index.js reactRootView?.startReactApplication(reactInstanceManager, "MyReactNativeApp", null) setContentView(reactRootView) } //////////////////////////////////////////////////////////////////////////////////////////////// //////////////////////////////////////////////////////////////////////////////////////////////// override fun invokeDefaultOnBackPressed() { super.onBackPressed() } override fun onBackPressed() { reactInstanceManager.onBackPressed() super.onBackPressed() } override fun onKeyUp(keyCode: Int, event: KeyEvent?): Boolean { if (keyCode == KeyEvent.KEYCODE_MENU && reactInstanceManager != null) { reactInstanceManager.showDevOptionsDialog() return true } return super.onKeyUp(keyCode, event) } //////////////////////////////////////////////////////////////////////////////////////////////// //////////////////////////////////////////////////////////////////////////////////////////////// override fun onPause() { super.onPause() reactInstanceManager.onHostPause(this) } override fun onResume() { super.onResume() reactInstanceManager.onHostResume(this, this) } override fun onDestroy() { super.onDestroy() reactInstanceManager.onHostDestroy(this) reactRootView.unmountReactApplication() } }
class MyReactActivity : Activity(), DefaultHardwareBackBtnHandler {
  private lateinit var reactRootView: ReactRootView
  private lateinit var reactInstanceManager: ReactInstanceManager
  override fun onCreate(savedInstanceState: Bundle?) {
    super.onCreate(savedInstanceState)
    SoLoader.init(this, false)
    reactRootView = ReactRootView(this)
    val packages: List<ReactPackage> = PackageList(application).packages
    // Packages that cannot be autolinked yet can be added manually here, for example:
    // packages.add(MyReactNativePackage())
    // Remember to include them in `settings.gradle` and `app/build.gradle` too.
    reactInstanceManager = ReactInstanceManager.builder()
      .setApplication(application)
      .setCurrentActivity(this)
      .setBundleAssetName("index.android.bundle")
      .setJSMainModulePath("index")
      .addPackages(packages)
      .setUseDeveloperSupport(BuildConfig.DEBUG)
      .setInitialLifecycleState(LifecycleState.RESUMED)
      .build()
    // The string here (e.g. "MyReactNativeApp") has to match
    // the string in AppRegistry.registerComponent() in index.js
    reactRootView?.startReactApplication(reactInstanceManager, "MyReactNativeApp", null)
    setContentView(reactRootView)
  }

  ////////////////////////////////////////////////////////////////////////////////////////////////
  ////////////////////////////////////////////////////////////////////////////////////////////////

  override fun invokeDefaultOnBackPressed() {
    super.onBackPressed()
  }

  override fun onBackPressed() {
    reactInstanceManager.onBackPressed()
    super.onBackPressed()
  }

  override fun onKeyUp(keyCode: Int, event: KeyEvent?): Boolean {
    if (keyCode == KeyEvent.KEYCODE_MENU && reactInstanceManager != null) {
      reactInstanceManager.showDevOptionsDialog()
      return true
    }
    return super.onKeyUp(keyCode, event)
  }

  ////////////////////////////////////////////////////////////////////////////////////////////////
  ////////////////////////////////////////////////////////////////////////////////////////////////

  override fun onPause() {
    super.onPause()
    reactInstanceManager.onHostPause(this)
  }

  override fun onResume() {
    super.onResume()
    reactInstanceManager.onHostResume(this, this)
  }

  override fun onDestroy() {
    super.onDestroy()
    reactInstanceManager.onHostDestroy(this)
    reactRootView.unmountReactApplication()
  }
}

Fix error

If you find error with Gradle sync

  • Rename your Android project folder to android
  • Re-open it, it should be built well

Call ReactActivity in MainActivity

Plain text
Copy to clipboard
Open code in new window
EnlighterJS 3 Syntax Highlighter
val intent = Intent(this, MyReactActivity::class.java)
startActivity(intent)
val intent = Intent(this, MyReactActivity::class.java) startActivity(intent)
    val intent = Intent(this, MyReactActivity::class.java)
    startActivity(intent)

iOS

Fix errors

  • pod init fails
    RuntimeError – [Xcodeproj] Unknown object version.
    Fix it by running sudo gem update xcodeproj
  • Create Podfile by copying content of Podfile from AwesomeProject Podfile
Plain text
Copy to clipboard
Open code in new window
EnlighterJS 3 Syntax Highlighter
require_relative '../node_modules/react-native/scripts/react_native_pods'
require_relative '../node_modules/@react-native-community/cli-platform-ios/native_modules'
platform :ios, '12.4'
install! 'cocoapods', :deterministic_uuids => false
target 'NativeIOS' do
config = use_native_modules!
# Flags change depending on the env values.
flags = get_default_flags()
use_react_native!(
:path => config[:reactNativePath],
# Hermes is now enabled by default. Disable by setting this flag to false.
# Upcoming versions of React Native may rely on get_default_flags(), but
# we make it explicit here to aid in the React Native upgrade process.
:hermes_enabled => true,
:fabric_enabled => flags[:fabric_enabled],
# Enables Flipper.
#
# Note that if you have use_frameworks! enabled, Flipper will not work and
# you should disable the next line.
:flipper_configuration => FlipperConfiguration.enabled,
# An absolute path to your application root.
:app_path => "#{Pod::Config.instance.installation_root}/.."
)
target 'NativeIOSTests' do
inherit! :search_paths
# Pods for testing
end
target 'NativeIOSUITests' do
# Pods for testing
end
end
require_relative '../node_modules/react-native/scripts/react_native_pods' require_relative '../node_modules/@react-native-community/cli-platform-ios/native_modules' platform :ios, '12.4' install! 'cocoapods', :deterministic_uuids => false target 'NativeIOS' do config = use_native_modules! # Flags change depending on the env values. flags = get_default_flags() use_react_native!( :path => config[:reactNativePath], # Hermes is now enabled by default. Disable by setting this flag to false. # Upcoming versions of React Native may rely on get_default_flags(), but # we make it explicit here to aid in the React Native upgrade process. :hermes_enabled => true, :fabric_enabled => flags[:fabric_enabled], # Enables Flipper. # # Note that if you have use_frameworks! enabled, Flipper will not work and # you should disable the next line. :flipper_configuration => FlipperConfiguration.enabled, # An absolute path to your application root. :app_path => "#{Pod::Config.instance.installation_root}/.." ) target 'NativeIOSTests' do inherit! :search_paths # Pods for testing end target 'NativeIOSUITests' do # Pods for testing end end
require_relative '../node_modules/react-native/scripts/react_native_pods'
require_relative '../node_modules/@react-native-community/cli-platform-ios/native_modules'

platform :ios, '12.4'
install! 'cocoapods', :deterministic_uuids => false

target 'NativeIOS' do
  config = use_native_modules!

  # Flags change depending on the env values.
  flags = get_default_flags()

  use_react_native!(
    :path => config[:reactNativePath],
    # Hermes is now enabled by default. Disable by setting this flag to false.
    # Upcoming versions of React Native may rely on get_default_flags(), but
    # we make it explicit here to aid in the React Native upgrade process.
    :hermes_enabled => true,
    :fabric_enabled => flags[:fabric_enabled],
    # Enables Flipper.
    #
    # Note that if you have use_frameworks! enabled, Flipper will not work and
    # you should disable the next line.
    :flipper_configuration => FlipperConfiguration.enabled,
    # An absolute path to your application root.
    :app_path => "#{Pod::Config.instance.installation_root}/.."
  )

  target 'NativeIOSTests' do
    inherit! :search_paths
    # Pods for testing
  end

  target 'NativeIOSUITests' do
    # Pods for testing
  end

end
  • Have to add this into info.plist to be able to load localhost metro bundle file
Plain text
Copy to clipboard
Open code in new window
EnlighterJS 3 Syntax Highlighter
<key>NSAppTransportSecurity</key>
<dict>
<key>NSExceptionDomains</key>
<dict>
<key>localhost</key>
<dict>
<key>NSTemporaryExceptionAllowsInsecureHTTPLoads</key>
<true/>
</dict>
</dict>
</dict>
<key>NSAppTransportSecurity</key> <dict> <key>NSExceptionDomains</key> <dict> <key>localhost</key> <dict> <key>NSTemporaryExceptionAllowsInsecureHTTPLoads</key> <true/> </dict> </dict> </dict>
	<key>NSAppTransportSecurity</key>
	<dict>
		<key>NSExceptionDomains</key>
		<dict>
			<key>localhost</key>
			<dict>
				<key>NSTemporaryExceptionAllowsInsecureHTTPLoads</key>
				<true/>
			</dict>
		</dict>
	</dict>
  • Build failed: Library not loaded: @rpath/hermes.framework/hermes
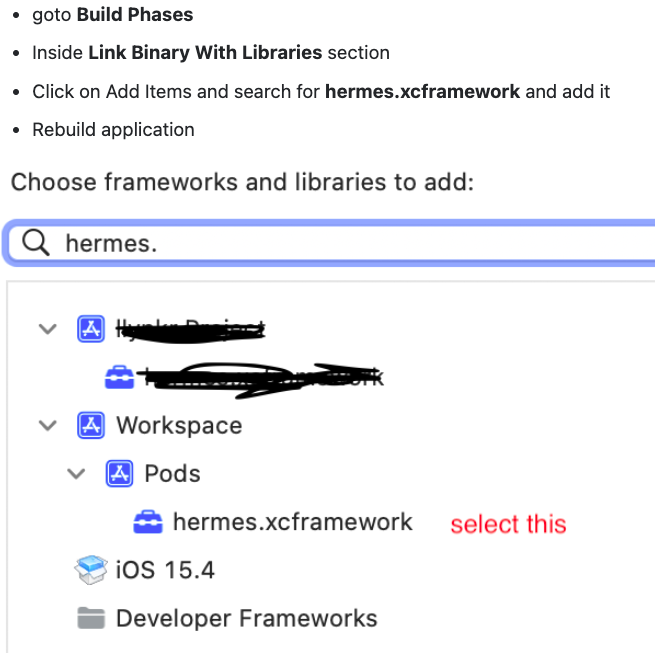
Create a new React Native view controller

Plain text
Copy to clipboard
Open code in new window
EnlighterJS 3 Syntax Highlighter
// ViewController.swift
import UIKit
import React
class ViewController: UIViewController {
override func viewDidLoad() {
super.viewDidLoad()
}
override func loadView() {
loadReactNativeView()
}
func loadReactNativeView() {
let jsCodeLocation = URL(string: "http://localhost:8081/index.bundle?platform=ios")!
let rootView = RCTRootView(
bundleURL: jsCodeLocation,
moduleName: "MyReactNativeApp", // This must be React Native registered component name
initialProperties: nil,
launchOptions: nil
)
self.view = rootView
}
}
// ViewController.swift import UIKit import React class ViewController: UIViewController { override func viewDidLoad() { super.viewDidLoad() } override func loadView() { loadReactNativeView() } func loadReactNativeView() { let jsCodeLocation = URL(string: "http://localhost:8081/index.bundle?platform=ios")! let rootView = RCTRootView( bundleURL: jsCodeLocation, moduleName: "MyReactNativeApp", // This must be React Native registered component name initialProperties: nil, launchOptions: nil ) self.view = rootView } }
// ViewController.swift

import UIKit
import React

class ViewController: UIViewController {

    override func viewDidLoad() {
        super.viewDidLoad()
    }

    override func loadView() {
        loadReactNativeView()
    }

    func loadReactNativeView() {
        let jsCodeLocation = URL(string: "http://localhost:8081/index.bundle?platform=ios")!
        
        let rootView = RCTRootView(
            bundleURL: jsCodeLocation,
            moduleName: "MyReactNativeApp", // This must be React Native registered component name
            initialProperties: nil,
            launchOptions: nil
        )
        self.view = rootView
    }
}

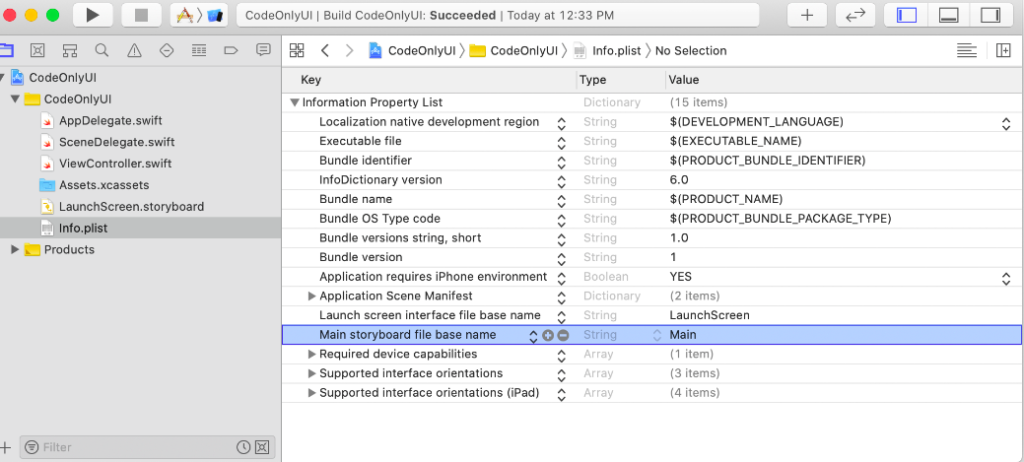
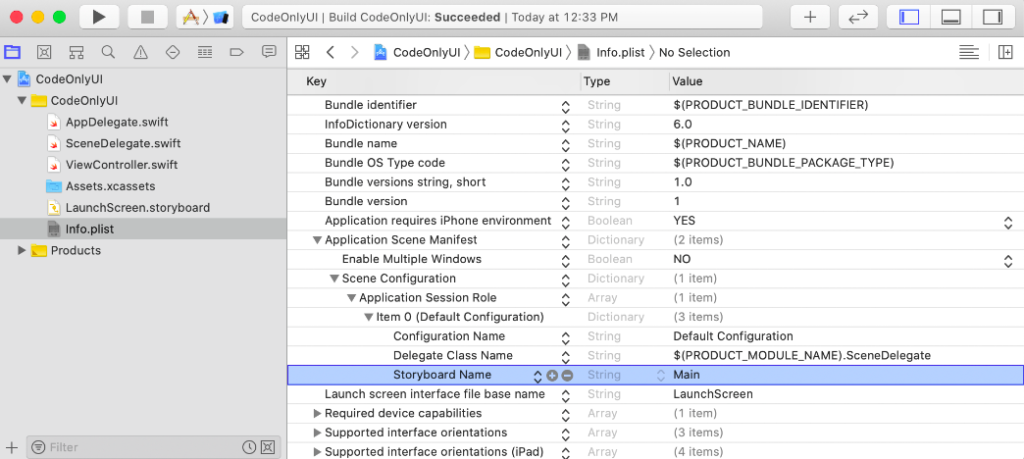
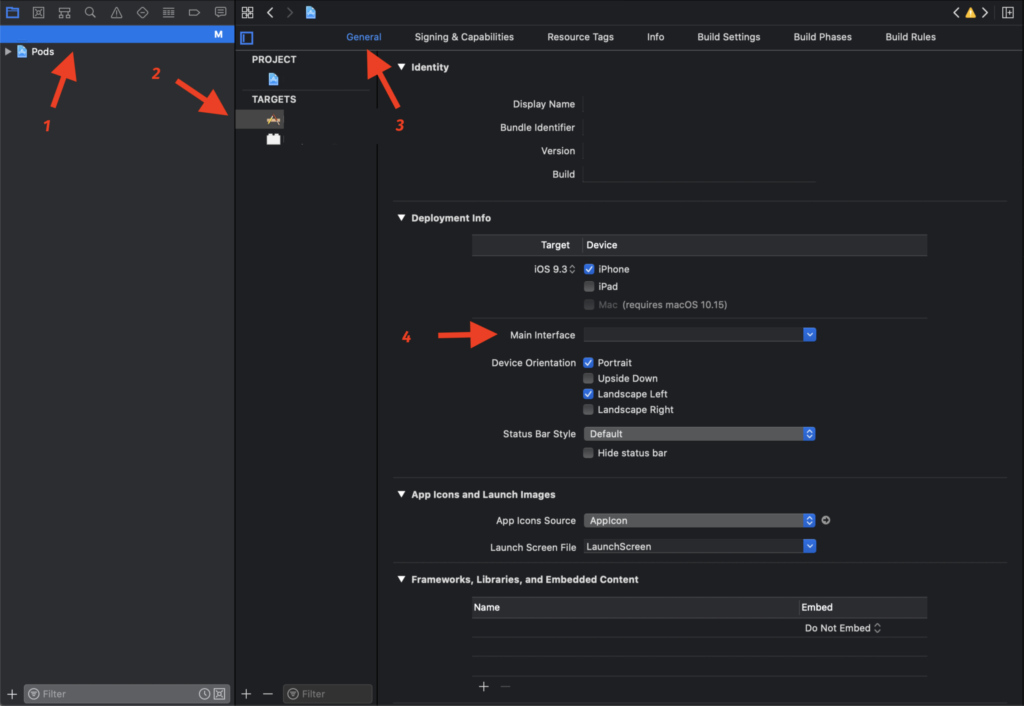
Delete Main.storyboard

  • Delete file itself
  • Delete its info.plist
This one may not be found
  • Delete its name in Main interface

Update SceneDelegate.swift for iOS >=13 targeted

Plain text
Copy to clipboard
Open code in new window
EnlighterJS 3 Syntax Highlighter
import UIKit
class SceneDelegate: UIResponder, UIWindowSceneDelegate {
var window: UIWindow?
func scene(_ scene: UIScene, willConnectTo session: UISceneSession, options connectionOptions: UIScene.ConnectionOptions) {
// Use this method to optionally configure and attach the UIWindow `window` to the provided UIWindowScene `scene`.
// If using a storyboard, the `window` property will automatically be initialized and attached to the scene.
// This delegate does not imply the connecting scene or session are new (see `application:configurationForConnectingSceneSession` instead).
guard let windowScene = (scene as? UIWindowScene) else { return }
let window = UIWindow(windowScene: windowScene)
window.rootViewController = ViewController()
self.window = window
window.makeKeyAndVisible()
}
}
import UIKit class SceneDelegate: UIResponder, UIWindowSceneDelegate { var window: UIWindow? func scene(_ scene: UIScene, willConnectTo session: UISceneSession, options connectionOptions: UIScene.ConnectionOptions) { // Use this method to optionally configure and attach the UIWindow `window` to the provided UIWindowScene `scene`. // If using a storyboard, the `window` property will automatically be initialized and attached to the scene. // This delegate does not imply the connecting scene or session are new (see `application:configurationForConnectingSceneSession` instead). guard let windowScene = (scene as? UIWindowScene) else { return } let window = UIWindow(windowScene: windowScene) window.rootViewController = ViewController() self.window = window window.makeKeyAndVisible() } }
import UIKit

class SceneDelegate: UIResponder, UIWindowSceneDelegate {

    var window: UIWindow?


    func scene(_ scene: UIScene, willConnectTo session: UISceneSession, options connectionOptions: UIScene.ConnectionOptions) {
        // Use this method to optionally configure and attach the UIWindow `window` to the provided UIWindowScene `scene`.
        // If using a storyboard, the `window` property will automatically be initialized and attached to the scene.
        // This delegate does not imply the connecting scene or session are new (see `application:configurationForConnectingSceneSession` instead).
        guard let windowScene = (scene as? UIWindowScene) else { return }
        
        let window = UIWindow(windowScene: windowScene)
        window.rootViewController = ViewController()
        self.window = window
        window.makeKeyAndVisible()
    }
}

Update AppDelegate.swift for iOS <= 12 targeted

Plain text
Copy to clipboard
Open code in new window
EnlighterJS 3 Syntax Highlighter
import UIKit
@main
class AppDelegate: UIResponder, UIApplicationDelegate {
var window: UIWindow?
func application(_ application: UIApplication, didFinishLaunchingWithOptions launchOptions: [UIApplication.LaunchOptionsKey: Any]?) -> Bool {
window = UIWindow()
window?.rootViewController = ViewController()
window?.makeKeyAndVisible()
return true
}
}
import UIKit @main class AppDelegate: UIResponder, UIApplicationDelegate { var window: UIWindow? func application(_ application: UIApplication, didFinishLaunchingWithOptions launchOptions: [UIApplication.LaunchOptionsKey: Any]?) -> Bool { window = UIWindow() window?.rootViewController = ViewController() window?.makeKeyAndVisible() return true } }
import UIKit

@main
class AppDelegate: UIResponder, UIApplicationDelegate {

    var window: UIWindow?

    func application(_ application: UIApplication, didFinishLaunchingWithOptions launchOptions: [UIApplication.LaunchOptionsKey: Any]?) -> Bool {

        window = UIWindow()
        window?.rootViewController = ViewController()
        window?.makeKeyAndVisible()
        
        return true
    }
}

Ref:
how-to-add-react-native-to-an-existing-ios-app-in-2022
remove-main-storyboard

Be the first to comment

Leave a Reply

Your email address will not be published.


*