How to add react-native-svg?
Android
Method 1
- Add this package into separate Android project
yarn add react-native-svg
- Then, everything is linked automatically when you open Android project in Android Studio
Method 2 (Not recommended)
This is to show you how to manually copy a react native’s android part into native Android project.
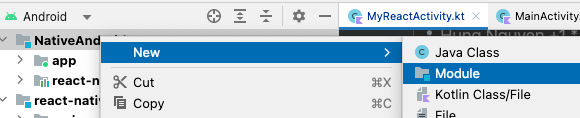
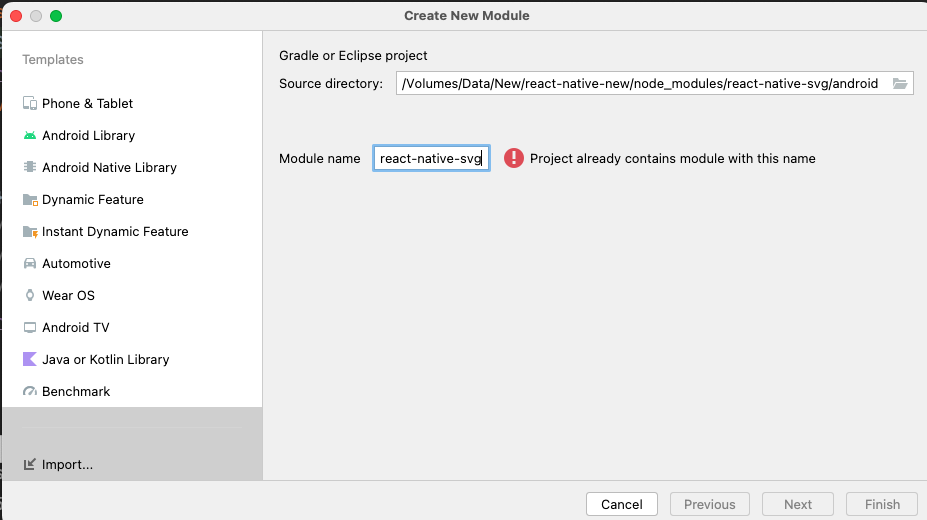
- Import Android project from react-native-svg node_modules folder
- Source directory: android folder
- Module name: react-native-svg


- Implement this lib into the project by adding this into app’s build.gradle file
implementation project(path: ':react-native-svg')
- Edit MyReactActivity.kt
import com.horcrux.svg.SvgPackage;
...
class MyReactActivity : Activity(), DefaultHardwareBackBtnHandler {
...
override fun onCreate(savedInstanceState: Bundle?) {
...
val packages: List<ReactPackage> = PackageList(application).packages.apply {
add(YourPackage())
add(SvgPackage()) // Add this
}
...
import com.horcrux.svg.SvgPackage;
...
class MyReactActivity : Activity(), DefaultHardwareBackBtnHandler {
...
override fun onCreate(savedInstanceState: Bundle?) {
...
val packages: List<ReactPackage> = PackageList(application).packages.apply {
add(YourPackage())
add(SvgPackage()) // Add this
}
...
import com.horcrux.svg.SvgPackage; ... class MyReactActivity : Activity(), DefaultHardwareBackBtnHandler { ... override fun onCreate(savedInstanceState: Bundle?) { ... val packages: List<ReactPackage> = PackageList(application).packages.apply { add(YourPackage()) add(SvgPackage()) // Add this } ...
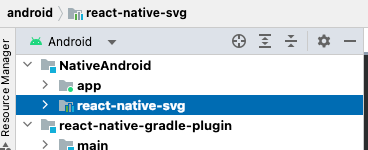
- Now you can run Android app
Issues
- If you don’t see native package displayed in the Android Studio, use “Invalid Caches” to restart Android Studio

iOS
Method 1
- Add this package to separate iOS project
yarn add react-native-svg
cd [your_ios_folder]
pod install
yarn add react-native-svg
cd [your_ios_folder]
pod install
yarn add react-native-svg cd [your_ios_folder] pod install
- Then, everything is linked automatically when you open iOS project in XCode
Method 2 (Not recommended)
Not tried yet
How to add react-navigation?
Javascript
- Install dependencies
yarn add @react-navigation/native @react-navigation/native-stack react-native-screens
- Create a sample routing file
import { NavigationContainer } from "@react-navigation/native"
import { createNativeStackNavigator } from "@react-navigation/native-stack";
import Home from "../screens/Home";
interface Props { }
const Stack = createNativeStackNavigator();
const Routing: React.FC<Props> = () => {
return <NavigationContainer>
<Stack.Navigator>
<Stack.Screen name="Home" component={Home} />
</Stack.Navigator>
</NavigationContainer>
}
export default Routing;
import { NavigationContainer } from "@react-navigation/native" import { createNativeStackNavigator } from "@react-navigation/native-stack"; import Home from "../screens/Home"; interface Props { } const Stack = createNativeStackNavigator(); const Routing: React.FC<Props> = () => { return <NavigationContainer> <Stack.Navigator> <Stack.Screen name="Home" component={Home} /> </Stack.Navigator> </NavigationContainer> } export default Routing;
Android
- Install dependency
yarn add react-native-screens
- Fix react-native-screens error: “ScreenStackHeaderConfig.kt: (393, 46): Unresolved reference: attr”
// if (context.theme.resolveAttribute(R.attr.colorPrimary, tv, true)) {
// toolbar.setBackgroundColor(tv.data)
// }
// if (context.theme.resolveAttribute(R.attr.colorPrimary, tv, true)) {
// toolbar.setBackgroundColor(tv.data)
// }
// if (context.theme.resolveAttribute(R.attr.colorPrimary, tv, true)) { // toolbar.setBackgroundColor(tv.data) // }
- Fix react-native-screens error: “In order to use RNScreens components your app`s activity need to extend ReactActivity”
- Add MainApplication.java (use the one from AwesomeProject)
- Fix AndroidManifest.xml file to use this “MainApplication”
- Extend MainActivity with ReactActivity (ReactActivity extends AppCompat by default)
- Remove unused MyReactActivity.kt
// AndroidManifest.xml
...
<application
android:name=".MainApplication"
android:theme="@style/Theme.AppCompat.Light.NoActionBar"
...
// Remove ReactActivity
<activity
android:name=".MyReactActivity"
android:label="@string/app_name"
android:theme="@style/Theme.AppCompat.Light.NoActionBar">
</activity>
// AndroidManifest.xml ... <application android:name=".MainApplication" android:theme="@style/Theme.AppCompat.Light.NoActionBar" ... // Remove ReactActivity <activity android:name=".MyReactActivity" android:label="@string/app_name" android:theme="@style/Theme.AppCompat.Light.NoActionBar"> </activity>
// MainActivity.kt
class MainActivity : ReactActivity() {
override fun getMainComponentName(): String? {
return "MyReactNativeApp"
}
override fun createReactActivityDelegate(): ReactActivityDelegate? {
return DefaultReactActivityDelegate(
this,
mainComponentName!!, // If you opted-in for the New Architecture, we enable the Fabric Renderer.
fabricEnabled, // fabricEnabled
// If you opted-in for the New Architecture, we enable Concurrent React (i.e. React 18).
concurrentReactEnabled // concurrentRootEnabled
)
}
}
// MainActivity.kt class MainActivity : ReactActivity() { override fun getMainComponentName(): String? { return "MyReactNativeApp" } override fun createReactActivityDelegate(): ReactActivityDelegate? { return DefaultReactActivityDelegate( this, mainComponentName!!, // If you opted-in for the New Architecture, we enable the Fabric Renderer. fabricEnabled, // fabricEnabled // If you opted-in for the New Architecture, we enable Concurrent React (i.e. React 18). concurrentReactEnabled // concurrentRootEnabled ) } }
iOS
yarn add react-native-screens
cd [your_ios_folder]
pod install
yarn add react-native-screens
cd [your_ios_folder]
pod install
yarn add react-native-screens cd [your_ios_folder] pod install
How to add package which has native linking?
- Install the package
yarn add @react-native-async-storage/async-storage
- Update pod
cd NativeIOS
npx pod-install
cd NativeIOS
npx pod-install
cd NativeIOS npx pod-install
Leave a Reply