Step 1 – Create App ID
- Go to the Apple Developer Account portal.
- Navigate to Certificates, Identifiers & Profiles.
- Select Identifiers and click the “+” button to create a new App ID.
- Choose App IDs and click Continue.
- Enter a description and a Bundle ID (e.g.,
com.example.myapp). - Under Capabilities, enable Push Notifications.
- Complete the setup by clicking Continue and then Register.
Step 2 – Create an APNs Authentication Key
- In the Certificates, Identifiers & Profiles section, go to Keys and click the “+” button to create a new key.
- Enter a name for the key (e.g.,
APNs Key). - Enable Apple Push Notifications service (APNs).
- Click Continue and then Register.
- Download the key file (
.p8) and keep it secure.
Note: You won’t be able to download it again.
Note the Key ID and Team ID — you’ll need them later.
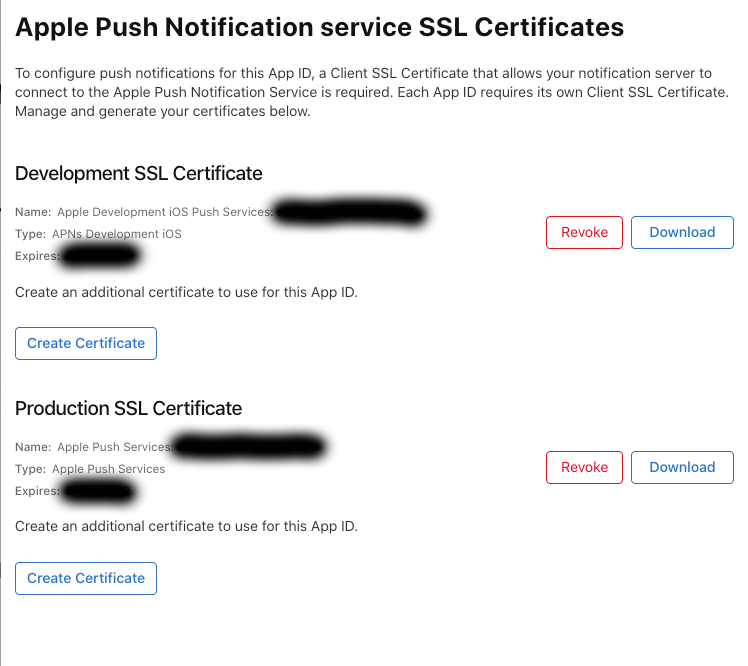
Step 2 b – Or generate an APNs Certificate
Generate cert
- Go to Certificates Section: Under the “Certificates” section, select “All” and click the “+” button to create a new certificate.
- Select Apple Push Notification Service SSL (Sandbox & Production): Choose this option under the “Services” section and click “Continue.”
- Select Your App ID: Choose the App ID you registered or want to associate with the APNs certificate.
Export .p12 file
- Open the
.cerFile: Double-click the downloaded.cerfile to add it to your Keychain Access. - Export to
.p12Format:- Open Keychain Access and find the certificate under “My Certificates.
- “Right-click on the certificate and select “Export”.
- Choose the
.p12format and provide a name for the file. - You will be prompted to enter a password to protect the
.p12file. - You can leave it blank, but it is recommended to set a password.
Configure APNs in Your Server
- Install APNs Libraries: Depending on the programming language or framework you’re using, install the necessary library to communicate with APNs (e.g.,
apnfor Node.js,apns2for Python,pushyfor Java). - Load the
.p12Certificate: Load the.p12file into your server application to authenticate requests to APNs.- Use libraries that support
.p12certificates and provide options to specify the certificate path and password.
- Use libraries that support
- Set Up Push Notification Payload: Construct the payload in the required JSON format. Ensure you have the device token to which the notification is to be sent.
- Send Push Notifications: Use the library to send notifications by connecting to the APNs server (
api.push.apple.com) using your.p12certificate.
Step 3 – Add Push Notification Capability
- Open your Xcode project.
- Go to Signing & Capabilities for your target.
- Click the “+” button and add the Push Notifications capability.
- If you set “Automatically manage signing”, uncheck and recheck again
- XCode will generate a new cert, and manage a new profile for you
- If you set “Automatically manage signing”, uncheck and recheck again
- Ensure that your app’s provisioning profile includes the Push Notifications capability.
- You may need to regenerate your profile on the Apple Developer portal.
Step 4 – Register and Handle Notifications in your app’s code
- Add code in
AppDelegate.swiftto register for push notifications:
import UIKit
import UserNotifications

@main
class AppDelegate: UIResponder, UIApplicationDelegate, UNUserNotificationCenterDelegate {

    var window: UIWindow?

    func application(_ application: UIApplication, didFinishLaunchingWithOptions launchOptions: [UIApplication.LaunchOptionsKey: Any]?) -> Bool {
        UNUserNotificationCenter.current().delegate = self

        // Request permission to show alerts and play sounds.
        UNUserNotificationCenter.current().requestAuthorization(options: [.alert, .badge, .sound]) { granted, error in
            print("Permission granted: \(granted)")
            guard granted else { return }

            DispatchQueue.main.async {
                // Register with APNs
                application.registerForRemoteNotifications()
            }
        }

        return true
    }

    // Called when APNs has assigned the device a unique token
    func application(_ application: UIApplication, didRegisterForRemoteNotificationsWithDeviceToken deviceToken: Data) {
        let tokenParts = deviceToken.map { data in String(format: "%02.2hhx", data) }
        let token = tokenParts.joined()
        print("Device Token: \(token)")
    }

    // Called when APNs registration fails
    func application(_ application: UIApplication, didFailToRegisterForRemoteNotificationsWithError error: Error) {
        print("Failed to register: \(error.localizedDescription)")
    }
}
This code:
- Requests user permission for notifications.
- Registers the device with APNs if permission is granted.
- Provides callbacks for successful and failed registration with APNs.
Step 5 – Send a Test Push Notification
To test push notifications, you’ll need a backend server or a service that can communicate with APNs.
- Backend Server Setup:
- You can set up a backend server using a language of your choice (e.g., Python, Node.js) and use the APNs REST API to send notifications.
- Use the
.p8file downloaded earlier along with the Key ID and Team ID to authenticate with APNs.
- Send a Test Notification Using a Tool:
- You can use tools like Postman, Pusher, or APNs Provider API tools to send test notifications.
Here’s an example using the APNs Provider API with curl:
curl -v --header "apns-topic: com.example.myapp" \
--header "authorization: bearer <your_auth_token>" \
--header "apns-push-type: alert" \
--data '{"aps":{"alert":"Hello from APNs!"}}' \
--http2 https://api.push.apple.com/3/device/<device_token>
Replace <your_auth_token> with the JWT generated using your .p8 file, <device_token> with the device token, and com.example.myapp with your app’s bundle identifier.
Step 6 – Handle Push Notifications in Your App
To handle push notifications when the app is in the foreground, implement the NUserNotificationCenterDelegate methods in your AppDelegate:
extension AppDelegate: UNUserNotificationCenterDelegate {
    // Called when a notification is delivered to a foreground app.
    func userNotificationCenter(_ center: UNUserNotificationCenter, willPresent notification: UNNotification, withCompletionHandler completionHandler: @escaping (UNNotificationPresentationOptions) -> Void) {
        completionHandler([.alert, .badge, .sound])
    }

    // Called when the user interacts with a notification (foreground or background).
    func userNotificationCenter(_ center: UNUserNotificationCenter, didReceive response: UNNotificationResponse, withCompletionHandler completionHandler: @escaping () -> Void) {
        // Handle the notification content
        completionHandler()
    }
}
Step 7 – Test on a Real Device
https://icloud.developer.apple.com/dashboard
Push notifications cannot be tested on the iOS Simulator for real APNs notifications. Ensure you test on a real device.
Step 8 – Deploy to Production
- Ensure your app is correctly configured for both development and production environments.
- Generate separate APNs keys or certificates for each environment (Development and Production).
- Make sure your server uses the correct endpoint (
api.push.apple.comfor production andapi.sandbox.push.apple.comfor development).
Q&A
Do I need to generate push notification certificate if I decide to use auth key for apns?
No
Does push notification still work if my push notification cert is expired and I’m using auth key?
Yes, if you are using an APNs Auth Key for sending push notifications, the expiration of your Push Notification Certificate does not affect the delivery of push notifications.
When push notification cert is expired, I update the cert, do I need to update the provisioning profile and rebuild the iOS app as well?
When your iOS Push Notification Certificate expires and you update it, you generally do not need to update the provisioning profile or rebuild the iOS app.
Leave a Reply